Homemade Fishing rod Storage Rack
 Ever since junior got his own room for himself and his toys, and I had to move my stuff out, personally i think that my precious toys, my fishing rods, are ignored, they simply sadly sit in the spot and gather dirt. I was lengthy planning to make some kind of a storage rack for all of them, but just never ever had enough time and means, until this getaway, i did so a little bit of research and discovered a design that is dead easy: it just consists in four bits of wood board plus the build does not need a shop or any specific machines, a drill could be the only saw that is required. Here’s the total range of tools and materials I utilized, you might want to adapt these to your requirements.
Tools:
- exercise
- hole saw (I utilized ⌀50mm)
- drill bits (⌀3 wooden, ⌀6 masonry)
- ruler
- vise (or clamps)
- saw
- paint roller (or brush)
- chisel (or x-acto blade)
Materials:
- four items of pine board*
- sandpaper
- timber glue
- lumber screws
- lumber filler
- lumber stain
- L shaped expansion anchor bolts
- draught excluder tape
- U-shaped nails
* the panels had been 2cm dense and 40cm large, two were 10cm broad and two 14cm. We needed seriously to attach the rack on an overhanging ray which was approx. 45cm. high, because of this that we utilized 40cm high boards.
Building the Rod Rack
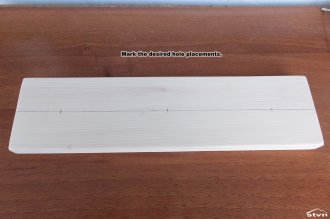
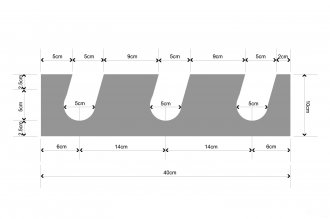
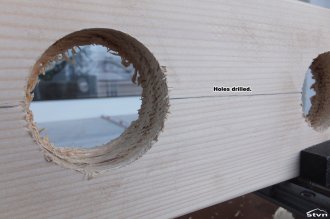
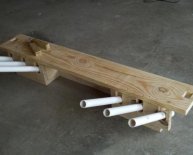
We’ll start with the smaller (10x40cm) panels, these is the components which in fact hold the fishing rods, first step would be to mark the middle of the boards after that decide where in actuality the holes is certainly going, I could only fit three 5cm diameter holding holes regarding the 40cm high board, each slot needs about 13cm of area between them to allow for pole and reel.
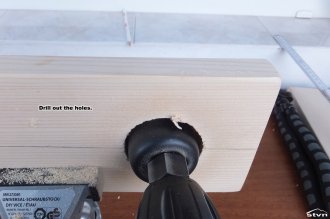
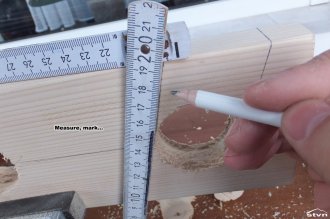
Once you worked out and marked the opening placings, mount the board into a vise or clamp it down firmly, after that make the holding holes utilizing the drill mounted circular saw, when you yourself have access to a drill hit, this is certainly a piece of cake. Alternative is to cut out the timber between your side of the board together with holes you just made, this has to be made at a sloping position; measure, level after that cut. I used a hacksaw because of this, it will take much longer, although tiny teeth leave a cleaner cut than a frequent timber saw. Supply the board a light sanding from the sides and set it aside for the present time.
 Measure and mark the middle of the bigger panels (14x40cm), this is how the smaller board are attached at a 90° direction, if you would like use clamps for the procedure you can skip this, but i used screws, correctly we needed to drill some pilot holes for screws in both bits of board. After that apply glue to your side of the smaller board and clamp or screw it set up, if you are using clamps you ought to wait for glue to cure, however if you used screws it is possible to check out the next phase right away.
Finishing and Staining
Since the round saw remaining some unsightly chipping on exit I used wood filler to correct the destruction and fill any flaws in the wood, after that sanded the excess filler and stained the racks.
After the stain dried the rod storage rack was finished, I just added some draught excluder tape in the slot machines making it scrape evidence.
Installing
When I previously mentioned, I had a need to install the rack on a reinforced concrete ray, although this strategy would additionally benefit brick or wooden surfaces, I’m uncertain it could work for plaster board.
Mark and drill holes when it comes to expansion anchors, we used two ⌀6mm for every single rack, after that install them. Next use the rack and put it across anchors, make certain it is amount then click it tough contrary to the protruding comes to an end, these will leave impressions regarding the wood marking where the accessory things will undoubtedly be. Take a little chisel or x-acto blade and carve from timber round the impressions, a 5mm deep and broad groove does, the length should be twice as much duration of the protruding anchor, 20mm within my situation. While you are through with the carving, just take a U shaped nail and set it up across groove during the center from it.
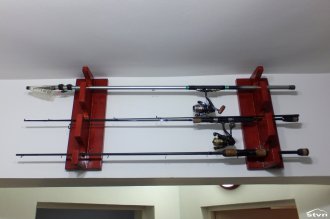
If you performed every little thing right the racks are now able to be firmly hanged regarding anchors as well as the fly fishing rod storage space rack is finished, only add your rods and luxuriate in.
Share this article
Related Posts
Latest Posts


