
How to Replace Fishing rod Guides?
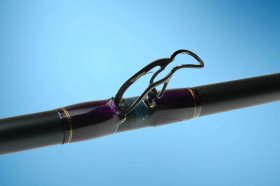 Commonly described as “eyes, ” guides tend to be exactly what lead the range down the fly rod and from tip-top.
What if one of our guides pauses on our rod? Generally, a porcelain insert gets bashed up against the side of the watercraft or truck, or we step on the rod laying in the deck of the boat causing it to turn into a mangled mess. Is this the end of the rods life? Do we have to spend some other person to invest an excessive amount of time restoring well known rod? With a few basic knowledge and tools, the response to both of these questions is “no.”
Assuming we already know just choosing just the right guide,, let’s get yourself started replacing this new one. Our first-order of business should be having the old guide off.
Guide Removal & Prep—Using a brand new brand new razor knife, cut straight down the thread wraps beginning on base of the guide cutting out of the guide band. Cutting over the guide foot guarantees you may not reduce into the rod blank. When the guide feet tend to be almost free, you should use a pair of pliers to carefully tug from the help guide to eliminate it.
You can use your shaver blade to very carefully cut away the rest of the guide wrap. Be cautious during this step even as we like to avoid cutting to the pole blank itself. We could now attach the guide to the pole blank either utilizing 1/4” masking tape or guide tubing.
The Wrap—Starting around 1/4” from guide, start wrapping from left to right. Wrap as soon as across the blank. Spot your finger regarding blank where the two threads meet to keep it from unwinding. Rotate the pole while crossing the operating thread over the tag end. It should lock into place after a few wraps.
You will definitely end wrapping after around eight wraps over the operating thread. Lay a razor knife as near to the wrap as you possibly can and pull label end contrary to the knife. Continue wrapping over the root of the guide. In the event that threads overlap, back off a few rotations and commence once more.
Share this article
Related Posts

Latest Posts


